

After six installments of “Making Stuff,” we had a garage full of machine tools and the basic skills to draw and build almost anything we could ever want. And if you know anything about machining, you’ve probably been screaming at every page: “WHAT ABOUT THE TOOLING!? TALK ABOUT THE TOOLING!”
Don’t worry, we heard you, but figured it made more sense to introduce the machines first. Now that they’re all here, it’s time to talk tooling.
What’s Tooling?
What exactly do we mean when we say “tooling?” It’s a broad term in machining circles that basically means “all the accessories you use to make your parts.”
End mills? Tooling. That vise? Tooling. Parallels? Collet blocks? Rotary table? Tapping head? Right angle attachment? Yes, yes and yes: That’s all considered tooling, and we’ve only scratched the surface with that list.
The common saying is, “You’ll spend far more on tooling than you will on any machine,” and if you buy new that’s absolutely correct. End mills can cost hundreds of dollars apiece, a decent vise is a nearly four-figure purchase, and that’s before you even get to the specialized stuff.
But if you’re already working on cars, none of this will be too surprising. Sure, you can do basic maintenance with that $200 toolkit, but any lifelong mechanic will have a toolbox they’ve invested tens of thousands of dollars into over the years.
Machine tooling works much the same way, with pieces being slowly bought, repurposed or made over time as each project calls for it. This story will cover our tooling journey over the first year or so, and at this point we’ve finally stopped buying stuff every time we turn on a machine. Call this the basics for getting started.
Tooling Shopping Basics
So where do you find all this tooling? If your uniform says “NASA” on it, then you probably buy it all new from trusted sources selling quality brands. A bunch of industrial suppliers specialize in this sort of customer, and McMaster-Carr is our favorite source when we’re feeling bougie.
Take a few steps down from industrial suppliers and you’ll find a plethora of inexpensive imported tooling on sites like Amazon and eBay. Is it any good? Generally, no–the name-brand tooling is usually more durable and more accurate–but we still have a fair bit of stuff we bought new from random imported brands.
In many cases, “not as accurate” won’t fly for fighter jets yet might be fine for parts for old cars, and sometimes we’re willing to sacrifice a few thousandths of precision for hundreds of dollars in savings. Likewise, “not as durable” can mean that it will last only a few years in our home shop instead of decades in a full-time business.
Our favorite place to buy tooling, though, is from other people who have already done the hard work of collecting it over a lifetime. People age, shops close, and time is a flat circle or whatever; that means used tooling is plentiful. As we were tooling up, we bought used gear from auction websites, in-person auctions, Craigslist and Facebook.
This isn’t an exhaustive list of what you’ll need to run a lathe and a mill in your shop, but it’s a good start. This is the gear that got our home shop started, and the prices are roughly what we paid.
Measuring Tools: $825

No, a tape measure isn’t accurate enough to build the parts we wanted to build. We keep adding more tools to our measuring drawer, which has now expanded to three full drawers of measuring tools.
We’ve had issues finding reliable used measuring tools, so instead we buy off-brand new equipment with good reviews. We’re giving up some durability, but accuracy seems to be right on point.
At a minimum, you’ll need a decent dial caliper ($40) and a dial indicator ($40), but we highly recommend a set of outside micrometers ($170) and a set of snap gauges ($25) to measure bores with more accuracy.
We often use our dial test indicator ($45) and coaxial centering indicator ($110), as they’re great ways to save time. We’ve also splurged on some pre-made holders that we’ll call quality-of-life tools: They just save so much time versus setting up an indicator manually. These include an indicator quill clamp for our Bridgeport ($50) and an Edge Technology Pro Tram system ($100) that makes tramming our Bridgeport’s head effortless.
We picked up a set of gigantic calipers ($100) to measure some Elva parts we couldn’t accurately read with our 6-inch set. Then there’s the used set of name-brand gauge blocks we bought at an auction ($60); they’ve proved invaluable for some measurements. We also have a machinist’s level ($85) to ensure our lathe is cutting straight. Oh, and you’ll need an edge finder for the mill; ours was kindly donated by 914Driver, a longtime member of GRM’s online community.
Angle Blocks and Parallels: $80

You’ll need these sooner rather than later to accurately clamp stuff in the vise. An imported set of parallels ($40) sets the height of stock, while an imported set of angle blocks ($40) lets you precisely clamp them at an angle.
1-2-3 Blocks: $40
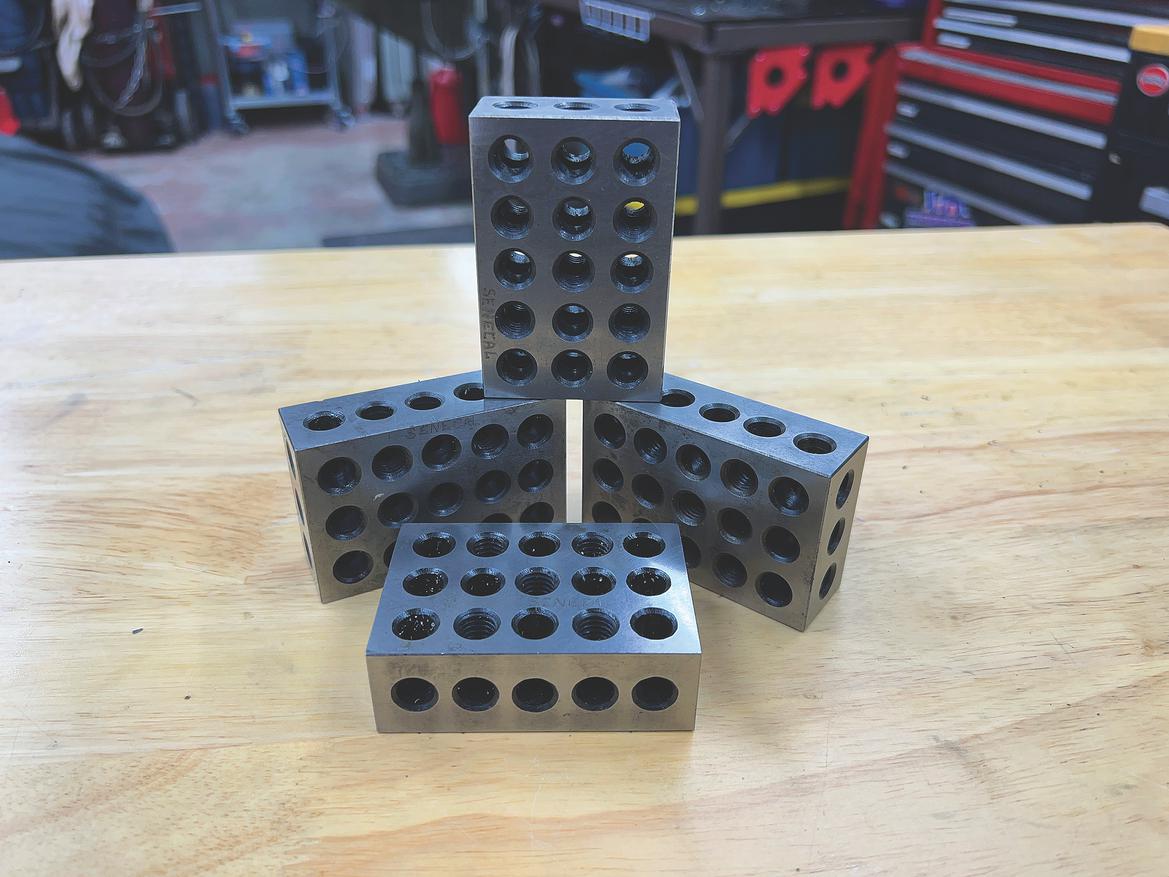
What are 1-2-3 blocks? They’re exactly what they look like: blocks of steel that are exactly 1x2x3 inches.
Because they’re ground square and flat, they’re extremely useful for clamping and measuring stock on the mill. These were another generous donation by 914Driver.
Used 6-inch Kurt Vise: $170

A vise is one of the tools you’ll use most, and it’s also a major contributor to accuracy when machining. Unlike a bench vise that simply holds what you’re working on, a machinist’s vise is expected to be perfectly straight and square–and to remain straight and square when clamping.
The advice we received was unambiguous: Buy a real Kurt vise or regret every operation with an off brand. Vises are measured by the width of the jaws, and 6 inches is perfect for a Bridgeport like ours. We scored a used Kurt with some drill marks for just $170. New, a vise like this is an $800 purchase.
Collet Blocks and Collets: $135

Collet blocks like this are great for indexing round things in a vise quickly–when you’re cutting flats on a rod, for example. We picked up a new set of imported collet blocks ($55) and paired them with a set of 5C collets ($80).
New Hold-Down Set: $80

Lots of things won’t fit in a vise, so you’ll need hold-downs. We highly recommend a basic set like this, which is sold under a million brand names. Used hold-downs are a decent option if you stumble across them for a steal, but they’re also probably bent and damaged. Use a new set like this as your baseline.
Tool Holders and Collets: $150

All those end mills and lathe tools need a way to attach to the machine, and that means collets for the mill and AXA toolholders for the lathe. We again chose new, imported tooling.
Small Drill Chucks: $70

We have a box of used drill chucks lying around, but wished for smaller ones for day-to-day use on the mill and lathe. We solved the problem for $35 each on Amazon.
Rotary Table: $440

How do you cut any arc on a manual mill? You need a rotary table, which allows you to precisely rotate the table with a little hand crank.
Generally, the bigger, the better, as a bigger table has more metal to add rigidity and more workspace for your fixtures. We wanted at least a 12-inch table, but we really wanted a 15-inch table.
Like the vise, this is a foundational tool, so we wanted an accurate, durable, name-brand piece. After searching locally for more than a year with no luck, we found this used 15-inch Gorton for $300 on eBay and paid over $100 to ship it to our door.
Spin Indexer and Dividing Head: $380

We needed to cut a 36-spline axle on the mill, meaning we needed a way to precisely index a part 10 degrees at a time. An inexpensive imported spin indexer ($80) uses the same 5C collets as our collet blocks and can divide into any full-degree increments. That makes it a great budget alternative to an off-brand dividing head and chuck ($300), which can divide its rotation nearly infinitely. One week after buying the spin indexer, we stumbled into a project that required the dividing head anyway, so now we own both.
Boring Head: $110

This is another tool you’ll need early and often if you have a mill. Again, we chose a new, imported model from Amazon ($110). Boring heads hold boring bars in a few positions and adjust in very fine increments, meaning you can create a precise hole of almost any dimension.
End Mills and Lathe Tools: $350

Remember when we said you could spend hundreds on a single end mill? Yeah, we got lucky: A retired machinist posted his entire collection–two full boxes–of end mills and high-speed steel lathe tooling on Facebook Marketplace for $25, and we were the first ones who showed up with cash. Some of the tools were dull, some were brand-new and most were in the middle, but they’ve been a great starting point for our collection.
In the months since, we’ve made some new tooling with all that HSS, bought a few end mills for special projects ($100), and picked up a new set of imported carbide insert tooling for our lathe ($90). We also bought a few imported boring bars ($80) for our Elva project. Oh, and we needed a 2-inch face mill when building some Bugeye Sprite parts, so we opted for an imported one from Amazon ($40).
Four-Jaw lathe Chuck: $50

Our lathe didn’t come with a four-jaw chuck, but we wanted one to build accurate parts. Fortunately, we had one lying around from a previous machine, but it wouldn’t thread onto our new lathe’s spindle. We saved a few steps and bought a pre-threaded backing plate on Amazon ($50), then machined it into the missing piece between our spindle and four-jaw chuck.
Giant Angle Plate: $40

Some operations require the rotary table to be mounted at a 90-degree angle, but unlike most tables, ours didn’t have a second mounting face for vertical use. We bought this 21-inch-tall steel angle plate at a local equipment auction.
Drawbar Wrench/Hammer Combo: $35
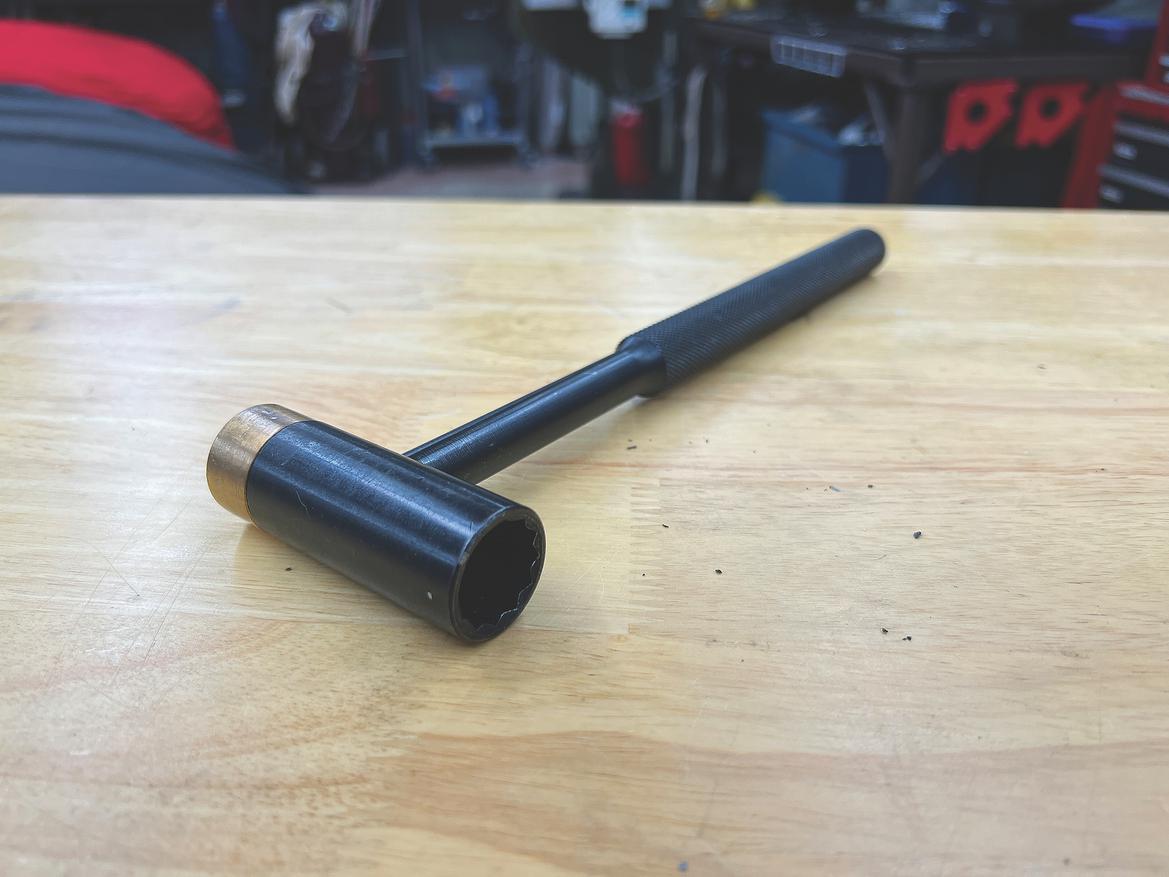
Sure, you can use a small hammer and a wrench, but this tool saves time during every tool change. We found it on Amazon.
Forklift: $450

You’re probably wondering how much all this tooling weighs. The answer? A lot. Just ask our poor UPS driver.
We found this small material lift at a machine shop liquidation auction and took it home for $450. It can lift about 800 pounds, so it’s perfect for putting fixtures on and off the mill. When we’re not using it, we store it under a bench, meaning it effectively takes up only a foot or so of space in the garage.
How Much to Outfit a Home Machine Shop?
Hopefully you’re sitting down for this: Our tooling costs total $3405, and that’s just the major pieces we could remember. If we went through the shop with a fine-toothed calculator, we’re sure the total would top $4000.
What does this mean for our quest to build a machine shop at home? Apparently it means we really are committed, but at least tooling up was a yearlong death by a thousand cuts instead of a giant upfront payment.

Just about every single tool on this list was purchased to tackle a job at hand, too, meaning they all represent money we didn’t spend at a local shop. So maybe call each tool the price of education as well.
We’re sorry that there’s no great takeaway from this installment other than “Machine shops are expensive,” but hopefully this has provided some clarity into the general statement that “Tooling is expensive.”
What’s next for this series? Now that the machine shop is assembled, it’s time to get back to making stuff. We’ll tackle our first complicated project–one destined for the race track–in the next installment.


